Showing posts with label Look-Alike or Real Deal?. Show all posts

Thursday, June 13, 2013

Dining Room Update for instant gratification

Like most DIYers, I always have millions of ideas floating around in my head....that plus a woman at my church declared I have ADD this weekend....so theres that too....actually this someecard describes the sitch in my head at all times:
Ok, anyway back to the story...so I have a lot going on in my mind and WAY more projects I wanna do than I will probably ever have time for..at ANY point in my life. I do make time for some projects, but occasionally I get too many in the hopper and feel overwhelmed. At the moment, I have the closet project, a new Ana White build (that I haven't even posted about yet!), and 2 pieces of artwork....along with you know 50ish hours of "real" work a week and the normal laundry (when its utterly necessary....if you still have 2 pairs of undies then you're good in my book) and normal house work (and mopping every 6 months is the norm, right?)....so sometimes you I just need little updates/projects that provide instant gratification.

SOOOOooo I bought curtains and a curtain rod for my dining room.....the room this bad-to-the-bone blogger hasn't updated you on in  FOR-EV-AH! The last time I showed you the dining room, it looked like this:

Here's it's current state:


sooooooo since the last time I updated you I have gotten:
6 Pottery Barn Seagrass Dining Chairs in Havana Dark- ya'll know I have an unatural addiction to seagrass, right?
by popping by the Pottery Barn Outlet once a week (and sometimes twice a week) on their truck day after work... I scored these 6 beauties (mind you one of them is out of the frame in this pic) for around 350 bones plus tax for all 6! So now we have 8 total dining chairs. The other 2 end chair lovelies I got for $65 each when the outlet had BOGO!

Restoration Hardware Look-Alike Chandy- swoon!!!
Restoration Hardware sells their Rectangle Shade Pendant for $595. Yikes. I LURVE it, but not like sell-a-kidney-on-ebay love it. This pretty lady came from Overstock...Gotta love the O price at $139 after a 20% coupon in my email. At $450 cheaper than the RH version I will definitely take it. This light is almost 4 feet long!!!! Thats a lotta light. I HEART it. And it's on poles....and you guys know how I feel about pole jobs

and last but not least...
I can never decide on curtains. I liked the JCP ones, but they were $100 EACH! what!? no. I will bust out my sewing machine that has been in the box for the 10 years before I will pay $100 each. Then they ran a half off sale and I found a coupon code...so I snatched them up like I was a kid at an easter egg hunt. 
Now other than hanging the rod, there wasn't a whole lot of work involved in this project...but I will share with you my little secret. You know the Target drapery rod I got? Well, it's extendable. Which means it has those little plastic rings at the extension parts like this...
Well, I took a brown Sharpie marker to the rings on my new ORB (shout out to YHL for makin this acronym popular) rod and look how they turned out....
and you can't see them at all when you're standing on the ground (i mean where else would you stand, but you know what I meant.).

So that's my little trick....now I really need to get a silver Sharpie out and do that nickel rod in the pic above this one. Hope my little trick helps someone.

I hope to have a closet update soon. Peace out awesome readers.

PS- please ignor the supa dirty dining room table....it will get cleaned....sometime.
PSS- I purchased all of these items with my own monies...none were given to me or sponsored by anyone.
PSSS- I am trying on new logos on my pics to cut down on them being stolen...it stinks like mustard lookin baby poo when someone claims a room in your house as theirs.


Linking up to: 

Affiliate Links 

Monday, February 25, 2013

Christmas in February!

For Christmas my parents gave us a gift certificate to Pottery Barn. They gave it to us with the intentions of us buying chairs for the dining room. I kinda ruined that plan....oops!. More to come on that later, but I am sorry 'bout that mom!!! Anyhow, Pottery Barn definitely gets loads of flattery from me in the form of imitation. I LOVE me some Pottery Barn. But I also love to take ideas and concepts from their catalogs and change them up. Make them my own. Put my own spin on it.....ok, ok you get the point. I like to be Sarah plain and simple, but with some unique twists thrown in. Kinda like the HOME sign I made that was inspired by Pottery Barn. But some Pottery Barn things just can't be made by me, so I am always stalking their outlet stores for the next treasure to take home. 

Well, DH & I happened to drop by the other night and low and behold we found a bargain! Remember, I posted during our 3 month progress & when we were hiding blue holes I posted the following picture of only 2 barstools.

Well, obviously that bar is made for 3 barstools, but I've just been too cheap to buy them all at once. I've been patiently impatiently waiting for them to come into the outlet store. And BAM, the other night they had one marked almost 67% off and you got an extra 15% off one item for their President's Day sale!! That made it almost 73% off. AND we had that gift certificate from my parents!!! WHOO-hoo! Christmas in February, people! We swiped it up and then crammed it into the backseat of the car.  And we didn't even use 1/4 of the gift certificate to buy it! 


It's crazy how much better 3 looks than 2. Or maybe I am just so thrilled to have picked up all 3 barstools for the price of 1!!

Affiliate Links 

Sunday, April 15, 2012

Simply Sarah Knock-Off of the Pottery Barn Eagan Mirror

Last weekend,  I did a project. I've had most of the supplies to complete this project since before Christmas. I have wanted to do this project for over a year though. Two Fridays ago, I bought my final supply needed to complete this project....and immediately I went home and started working.
What kinda project you ask!? Another Pottery Barn Knock-Off, of course. Pottery Barn should really be flattered, because a whole lot of my projects stem from inspiration I get from their catalogs and stores.(They should also also like me because their outlet store gets quite a few of my dollars.)
So what did I choose this time?
I chose the lovely, the gorgeous, the oversized, the EXPENSIVE Pottery Barn Eagan Mirror.

Before I made my Pottery Barn Inspired Numbers Canvas, I thought that the Large Eagan Mirror would look grand over my "big" wall in the living room. BUT, I can't imagine EVER paying $699 for a mirror?! Yikes, thats a lot dough for something that just hangs there. But I LOVE how my canvas turned out, so then I liked the Small Eagan Mirror for my triangular shaped hallway. But again it's not cheap either...$249 for a hallway mirror!? No way, Jose! I am WAY to cheap for that. So when I saw a pack of mirror tiles on clearance in Target, I snatched them up quick. I mean finiding those mirrors clearanced, that HAS TO mean I was supposed to knock off that mirror! Here's a quick pic of the smaller Eagan mirror as thats more what mine would look like.


So here's a step by step process of how I made my mirror.

#1- Sketched Out My Plan
On scratch paper, I roughly sketched out how I wanted my mirror to look. I had preshopped what size molding Lowes carried, so I knew what size lattice and corner pieces I was gonna get... 3/4 inch by 8 foot pieces. So for the width measurements I just added 2.25 inches (.75 left side molding + .75 vertical molding + .75 right side molding) to 24 inches (two 12 inch square mirrors) to get 26.25 inches for the width.  Then for the length measurements I just added 3 inches (.75 top side molding + two .75 horizontal moldings + .75 bottom side molding) to 36 inches (three 12 inch square mirrors) to get 39 inches for the height.

--------------------------

#2- Gather Supplies

Here's what all I had to buy:
-two 8 feet pieces of corner molding @ $3.97 each
-one 8 foot piece of lattice molding @ $3.97
-Liquid Nails Mirror Adhesive (in the caulk dept) @ $4.97
-one caulk gun @ $2.97
-one 2 pack of D-Rings @ $1.97
-one 3 pack of 50 lb Picture Hangers @ $1.97
-one 4 pack of Mirror Rosettes @ $1.97
-one can of Rustoleum Oil Rubbed Bronze Paint & Primer in one @ $6.97
-one 4'x4' of 3/4 inch pine plywood @ $16.97
-one 6 pack of 12"x12" mirror tiles @ $9.97 ( $30 at Lowes/HD or you could buy the smaller sizes at Hobby Lobby/Michaels)
=$59.67 spent
Here's what I already had on hand:
-Miter Saw and Miter Box (these cost about $10 together at Lowes...mine is well used)
-Industrial Glue Gun and Glue Sticks (about $15 together from Lowes)
- Elmers Industrial Pro Bond Wood Filler (about $5 from Lowes)
--------------------------

#3- Lay out Design
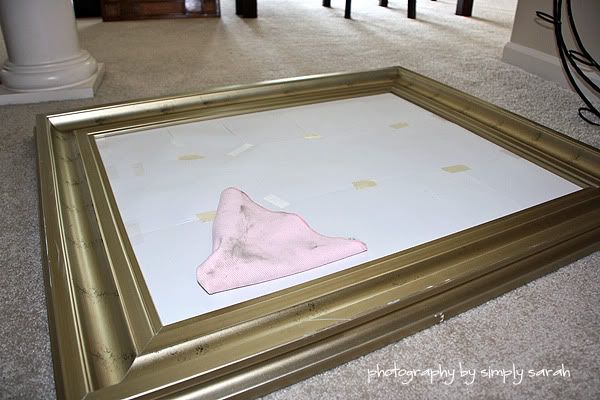
As soon as I got home with the plywood, I rushed into my shoproom extra bedroom and started laying out how I wanted it to look. I had taken my measurements with me to Lowes when I purchased the plywood. Lowes will make 2 cuts complementary, so I had my plywood cut to size. When I started laying things out, however, I realized both sides were a little too big.  I think its my fault because that corner molding stuff even though the outside is 3/4 inch, the inside is more like 1/2 inch. The dotted lines in the picture below indicate where I need my plywood cut off.
So what next?? Well, I had to wait til morning when the battery for our circular saw (which has never been used) was charged. So Saturday, the circular saw got used....just to trim those pesky little slivers of the sides off my plywood. I have no pictures of this process....first time using a circular saw = zero pictures...all hands needed on deck for that. The edge was then much smaller and suitable to fit the corner molding.  The circular sawing thing was actually a really smooth and easy process...I will definitely be using that fabulous power tool in the future.


--------------------------

#4- Cut Lattice Molding and Miter Corners
I laid the pieces of corner molding on the sides and then laid the mirrors flush up next to them. Then I took the lattice molding (just a flat piece of molding) and placed it down the center in between the mirrors. I used a pencil to mark where I needed to cut. Then I just put the piece into the miter box, lined the pencil mark up, and cut.
Why yes, that is my fine looking worktable I mean carpet and plywood-scrap miter box setup. It works great, thank you very much.  At least it's not the kitchen island...I use that often for sawing...lol.
Next I did one of the long sides of corner molding. Now I am not gonna lie. These corner moldings are tricky. I messed up 2 pieces. Here's how I ended up resolving the issue. Lay them, mark the cuts with a pencil, and then add a 1/2 inch to each side. That seemed to work like a charm and cover up the 1/2 inch of inside that I mentioned earlier. Remember to cut your 4 corners at a 45 degree angle (like in the pic below) using the miter box.
Here's how it all looks just laying on top of the plywood after I got done making all my cuts.


--------------------------

#5- Attach D-Rings and Wall Protection
So after laying it all out, I decided to go ahead and put the D-Rings to hang it on the back. That way I didn't have to drill them in after making the front all pretty....and therefore risk scratching the front up. I used two D-rings.
I also decided to add some huge, chunky circles of hot glue to the bottom. This way after it's hung, those hot glue circles will be hitting the wall rather than plywood.
I hate creating dents in the wall, so woot, woot for wall protection!


--------------------------
#6- Hot Glue on the Molding
Next, I hotglued (is that a word!?...it has to be, I use it all the time!) on the edge moldings. I ran a thick bead of hot glue down the center of the corner moldings. I also ran a thin bead on the edge of the plywood. Then I would press the molding onto the plywood making sure it lined up properly. Everytime I started a new side, I made sure all the pieces still fit together snugly. Better safe than sorry. Check twice, hot glue once.
After getting all the corner molding onto the side, I hotglued the vertical lattice molding down the center. I opted to not hotglue the horizontal lattice molding pieces at this point.

--------------------------
#7- Wood Filler and Spray Paint!
After letting the hot glue dry, I smeared a smidge of wood filler into the corner cracks with my finger. Just a little bit...just enough to make the corners disappear. I let that dry for a few minutes til it was hard and then took the whole sha-bang outside to spray paint. I placed paint cans underneath it so I could spray paint the sides and top all at once. I placed the horizontal pieces and the mirror rosettes on top of it too, so that they would get a sprayed. Below is a pic of it spray painted, after I brought it back and started laying the mirrors and horizontal pieces back on to check the fit again. It looks black in the picture, but in person its a beautiful oil rubbed bronze.


--------------------------
#8- Adhere Mirrors and Hot Glue Horizontal Lattice
After making sure everything fit again, I started attaching the mirrors and horizontal lattice molding pieces. I started with the top left corner mirror, then the bottom left corner mirror, then did a horizontal lattice piece, then did the left center mirror, and then last left horizontal lattice piece. I used 5 big fat dots of mirror adhesive on the mirrors. (Although this might be a bit excessive. The bottle said it was good for 6 square feet of mirrors....and I ran out on my 5th mirror.)
I followed the same methodology for the right side. I then placed heavy objects on top of the mirrors to make sure they adhered well and laid flat.

--------------------------

#9- Hang Your Masterpiece
The liquid nails mirror adhesive says to wait 72 hours before hanging. Well, I've waited that long, but still haven't hung it. Why you may ask? Well, hanging things on the wall is my hubs job. He hangs all my masterpieces for me. Actually we kinda work as a team to hang things because I'm a bit of a perfectionist and it takes 2 to get it JUST right. Anyhow, DH has been crazy busy studying his head off for the dreaded CPA exam. Don't know what the CPA exam is?? Google it. It's really interesting...trust me. (Sike!) If you google it though then I'm sure you will find thousands of people currently sharing in my husbands test-taking misery.

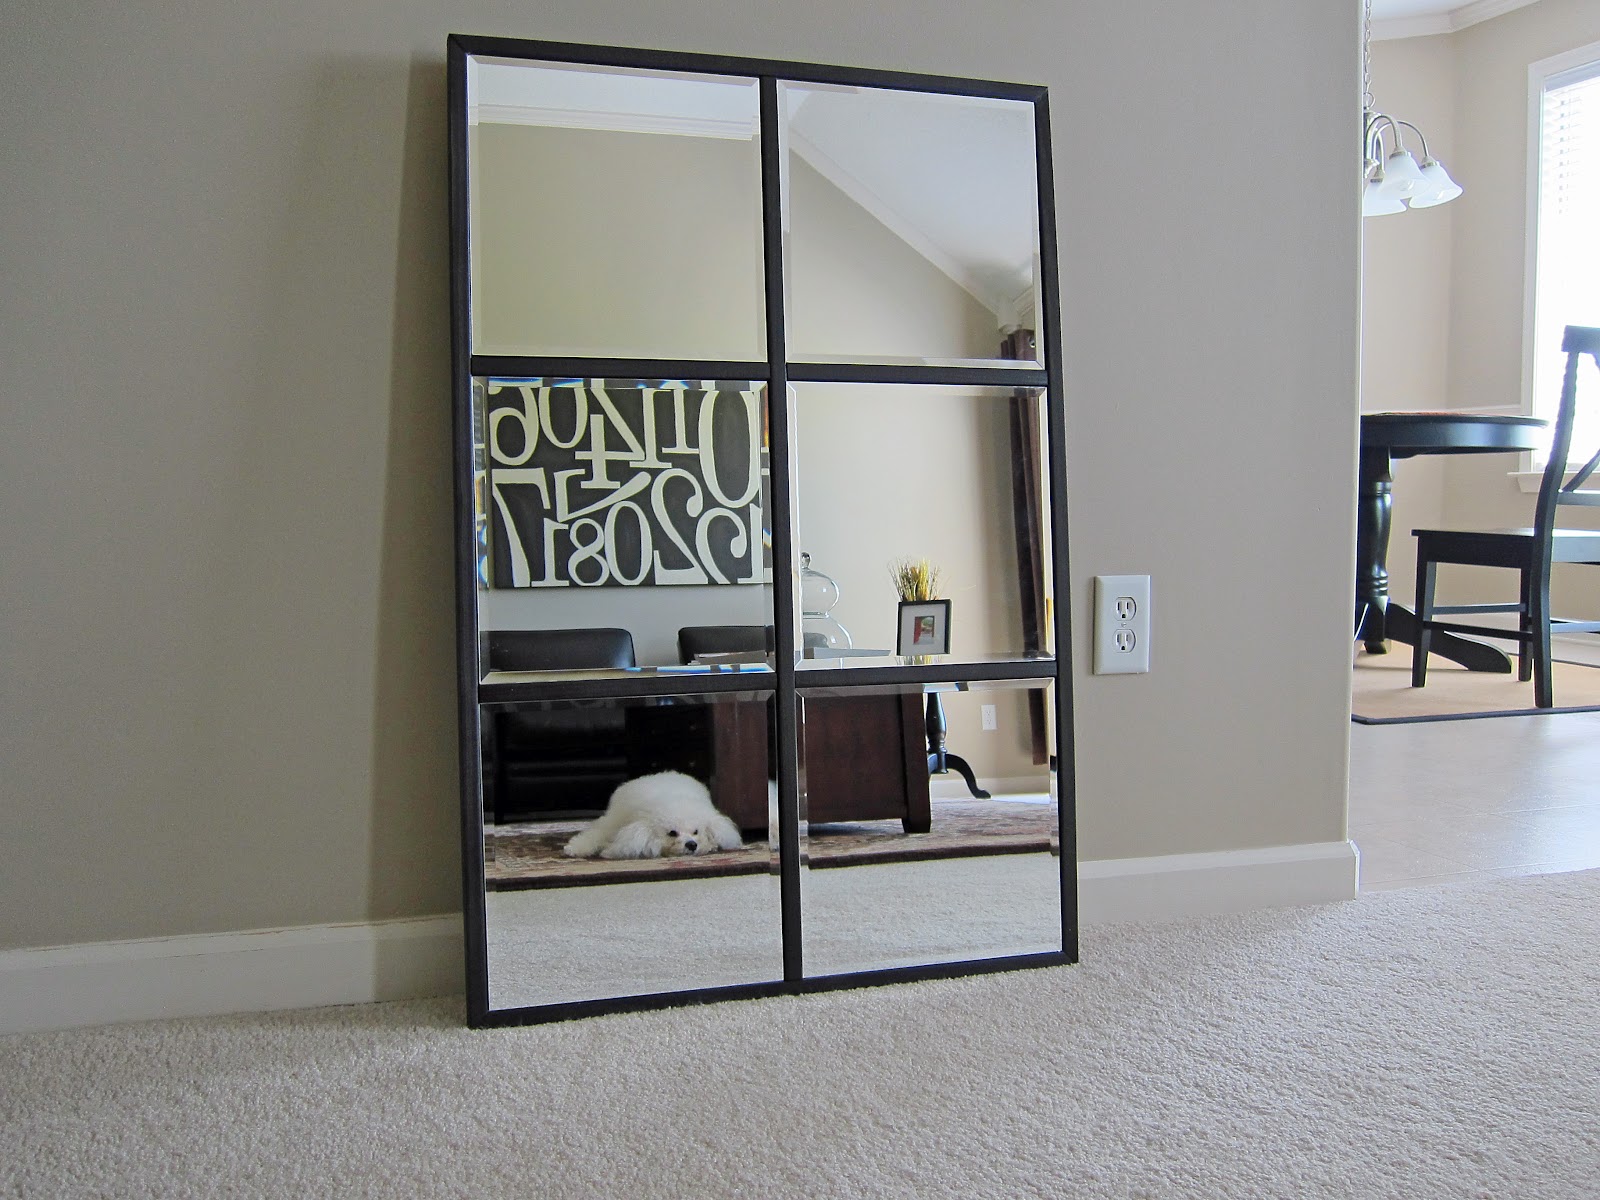
So since I don't have it hung in that crazy triangularish shaped hallway of mine yet, I will just leave you with a shot of the finished mirror leaning on my living room wall.

I think it turned out GORGEOUS! It will make such a statement in that hallway. I know it doesn't look exactly like the Pottery Barn version, but I think I actually like the big mirror tiles better than the smaller ones. Also I spray painted the mirror rosettes, but after laying them in place I decided I liked it better without them. My completed version is a bit bigger than the PB Small Eagan Mirror. It measures about 26 inches wide by 39 inches tall and weighs 30 lbs. Costs about $60 to make my custom version over the $250 Pottery Barn version...thats over a 75% savings!
I CANNOT wait to hang it! Cute, sleepy pup not included in project. :)

And here's the side by side view of the Pottery Barn version and the Simply Sarah version.


Parties I'm Linking to:

Affiliate Links 

Saturday, August 20, 2011

Pottery Barn Circles Votive Holder Knock Off

I am back with another PB Knockoff. This time the knock off is for our master bedroom. (I also found a bargain last night that I added to my master bedroom that I have to show at the end of this post).  So here's my knockoff target...

The Pottery Barn Circles Wall-Mount Votive Holder. As soon as I saw, it in the catalog I LOVED it. It would never look right in my master bedroom though, but I really wanted something akin to this to hang above the bed. I needed something in silver to show up on our dark brown walls and I didnt really care about the candles being on there. Also it was $119 and everyone knows I didn't really care for that price. I needed something on the cheap and custom...so of course I just made it and I LOVE the finished product!

Here's how I made it:

Step #1-  I started by gathering my supplies:
Supplies:
2 each of 8", 10", 12", and 18" wooden embroidery hoops from Hobby Lobby
1 can of Valspar Spray Primer (already on hand)
1 can of Valspar Satin Nickel Spray Paint (around $3)
Picture Hanging Wire (on hand)
Tools:
my trusty glue gun (on hand)
saw (or you could use a knife to score and then break the wood)
pencil

You can see the prices on the embroidery hoops in the pictures. I checked out twice actually, so that I could use 2 of their 40% off coupons from the website on the 18" embroidery hoops. The total of the 2 transactions came to $13.72....although I didn't end up using every small hoop so you could get by cheaper. So my total for this whole project was around $16-$17.


Step #2-  Laid out the hoops in the pattern I wanted to use
I measured the space above my bed to know how long and wide I wanted this piece to be. I couldn't find 2 measuring tapes (they always go missing around here!), so I laid out a few yard sticks to judge the length by and extended the measuring tape to judge the height by. I then took the embroidery hoops and laid them out in the pattern I wanted. I used the PB picture as my guide because I really liked their placement of the hoops.

Step #3-  Mark where the hoops overlap
Basically, anywhere a hoop overlapped another hoop I made line on both the touching hoops.

Step #4-  Remove hardware from the hoops
I basically just pulled on it and for the most part everything popped right off. For the stubborn pieces I grabbed a screwdriver and wedged it underneath to pop it off.

Step #5-  Cut or Break the hoops on the mark made in Step #3
Everywhere the hoops overlapped I drew a pencil line on them. Then I used a hand saw to cut straight down through the hoop. A few times I also scored the lines with a knife and just broke the thin hoops. During this whole process, I kept the whole pattern laid out in the floor. That way as soon as I cut a piece, I could put it right back it its place in the pattern. Otherwise I think I would've gotten all my pieces mixed up and wouldn't have been able to piece it back together properly.

Step #6-  Hot Glue all the pieces back together
You could use wood glue to glue all your pieces back together but that takes forever to dry. Hot glue just dries so fast...and I am fairly impatient I guess...so I used hot glue. It worked great though. The reason I cut them apart and then hot glued them together is so that once painted the whole thing would look more seamless. Yes, the embroidery hoops are a hair different in thickness, but they are not that different. But if I had've just glued them together, they would've had a more stacked look. The PB one basically looks several metal hoops saudered together, so that is what I was going for here. Also, I filled any holes left in the wood from ripping the hardware off with hot glue...eventually it will all get covered up with spray paint anyhow. Sorry, I have no pictures of the hot glue process...I cannot hot glue and take pictures, apparently.

Step #7-  Create hangers
I cut 2 appx. 2 inch pieces of picture wire. Then I wrapped each piece around a nail and then twisted the extra creating a small wire hoop and slid it off the nail. I then hot glued the twisted length of the wires the inside of the hoops at the 2 tallest portions of the artwork.

Step #7-  Spray primer and Spray paint
Basically after the hot glue had set for about a day, I took it outside and spray primed it. Then let it sit for an hour or so to cure. Then I spray painted it satin nickel and let it sit for another hour.

And here's the finished product hanging on the wall.
  
And here's a shot of it over the bed. I think it fits the space perfectly.
  
And here's another shot of it...
and did you notice that big leaning mirror?!! That was my bargain I snagged last night. It's a silver West Elm Chunky Wood Floor Mirror. EEK!!! Yep, I just happened to stop by the West Elm Outlet last night and saw it for 60% off!!! That is cheaper than buying a floor mirror from Lowes. Plus this thing is a solid, hefty 110 lb wooden one. I mean this is SUPER nice quality that I only had only "dreamed" of having. I have LOVE LOVE LOVED that mirror ever since I spotted it in the catalog, but I have NEVER seen it in the outlet EVER. Actually I had never seen it in person til last night. We did not have a full length mirror in our house, so this was PERFECT. LOVE it! 

I also had cleaned up the rest of our room so I figured why not just take a few more shots... even if they had nothing to do with my project. Might as well show you the rest of the room :)~


So one last time lets compare the PB version to my version:

I think it looks great. No it's not an exact replica, but it wouldn't work in my room if it was.
Plus for about $100 cheaper than the original PB version, I think I will keep mine!

Thanks for looking! Hopefully this inspires you to create some artwork of your own.

Linking up to:
DIY Club

Affiliate Links 

Tuesday, August 24, 2010

PB Inspired: Entryway Message Board

We, like every other household, have a buncha "stuff" that we come in the door with and lay on the counter. Well, I decided it was time to do away with the clutter. We have a weird entry way from the garage though (which is the one we use all the time) and I knew I couldn't fit much there. From the kitchen to the garage door its about 4 feet long by 4 feet wide portion first and then curves to another 4 feet long by 4 feet wide to where the door to the garage and laundry are located. I really wanted to try to fit something in that weirdly angled first 4x4 spot. So here's what I did...

The plan for the entryway message board didn't actually start out as a message board, but rather a mirror. I found this awesome, yet beat-up, scratched-up HUGE mirror on clearance at Old Time Pottery for around $10. My pup decided to pose with the dusty mirror I'd picked up. She's about foot tall, and my table it's leaning on is a counter height table, so that gives you an idea of the height of this mirror.
I thought I could get the rubs off the mirror itself and just paint the frame of the mirror. I first covered up the mirror itself with papers and painters tape and gave the frame a quick rub down with a cloth since it was  pretty dusty. You can see the scratches in the frame in the pic below.  You can also see how thick and gorgeous it was for $10.
I gave it a few light coats of Valspar Satin Black Indoor Spray Paint (which is fairly cheap), so the frame was lookin' good.When it was dry, I pulled the papers off and began cleaning the mirror. I used a Mr. Clean Magic Eraser on it only to reveal the rubs weren't paint from another mirror rubbing on it, but actually scratches in the surface of the mirror. Since I couldn't use the mirror itself, it was time for Plan B. (Which I ended up liking more than Plan A.) I LOVE LOVE LOVED these huge framed cork message boards from Pottery Barn
But of course, I wasn't forkin' over that much cash for a corkboard! No way, Jose! In my garage, I had an old, big wall corkboard from the 90s that my brother had given me. I no longer used it because well, lets face it...it was very 90s-ish (
I used an exacto knife to cut out the corkboard to fit the frame I'd painted. Then a few nails and staples into the backside later...and WA-LA! A framed corkboard!
I found that thin-width table and baskets to go underneath it. Together the corkboard and table cut back on all my counter clutter. We keep our keys, cell phones (and chargers), D's IPod, my camera (see my new Cotton Candy by Natalie strap hanging out!), etc in those baskets. Plus that corkboard keeps us from losing important stuffs or forgetting appointments. I think that my $10 version with it's thick frame looks MUCH MUCH nicer than the plain framed PB version and for $139 CHEAPER!

Wanna make your own, but don't have the supplies on hand? Don't worry, buying the supplies will be MUCH cheaper than the PB version. You can buy open face frames on the cheap at Michaels & Hobby Lobby (with their coupons, of course) and you can snag a roll of corkboard at those crafts store. You can also get the corkboard rolls online> HERE.

I will be linking up to the following parties:

Visit thecsiproject.com


HOG

Tuesday, August 17, 2010

Look Alikes or Real Deal: PB Lanterns

So I love love love the outdoor lanterns that are making their way inside everyone's homes as decorations. Of course all the big, expensive home furnishing stores are getting in on the lantern loving. Pottery Barn has LOTS of lanterns for the choosing. Here's a few examples and links to the lanterns:
         
Fluted Red Lanterns                             Park Hill Lanterns
 

And then theres my personal favorite, the X Lantern...
but of course it doesn't come in white and if I put it on a dark shelf, the black just wouldn't show up and show it's true beauty. Of course, I could always paint it, but who wants to paint (much less actually buy) a $79 lantern. Not me! So I began the hunt for knock off....and just when I wasn't looking for it, I found it! Old Time Pottery had these great knock offs which are the size of the PB Medium X Lantern for $4.99 They even came in an off-white! Score! Here's a quick pic of it in it's new home on my shelf.
Love it! Has anyone else scored any great knockoffs or found a "real-deal" at a fab price lately? If so, share.