Last weekend, I did a project. I've had most of the supplies to complete this project since before Christmas. I have wanted to do this project for over a year though. Two Fridays ago, I bought my final supply needed to complete this project....and immediately I went home and started working.
What kinda project you ask!? Another Pottery Barn Knock-Off, of course. Pottery Barn should really be flattered, because a whole lot of my projects stem from inspiration I get from their catalogs and stores.(They should also also like me because their outlet store gets quite a few of my dollars.)
So what did I choose this time?
I chose the lovely, the gorgeous, the oversized, the EXPENSIVE Pottery Barn Eagan Mirror.
Before I made my Pottery Barn Inspired Numbers Canvas, I thought that the Large Eagan Mirror would look grand over my "big" wall in the living room. BUT, I can't imagine EVER paying $699 for a mirror?! Yikes, thats a lot dough for something that just hangs there. But I LOVE how my canvas turned out, so then I liked the Small Eagan Mirror for my triangular shaped hallway. But again it's not cheap either...$249 for a hallway mirror!? No way, Jose! I am WAY to cheap for that. So when I saw a pack of mirror tiles on clearance in Target, I snatched them up quick. I mean finiding those mirrors clearanced, that HAS TO mean I was supposed to knock off that mirror! Here's a quick pic of the smaller Eagan mirror as thats more what mine would look like.
So here's a step by step process of how I made my mirror.
#1- Sketched Out My Plan
On scratch paper, I roughly sketched out how I wanted my mirror to look. I had preshopped what size molding Lowes carried, so I knew what size lattice and corner pieces I was gonna get... 3/4 inch by 8 foot pieces. So for the width measurements I just added 2.25 inches (.75 left side molding + .75 vertical molding + .75 right side molding) to 24 inches (two 12 inch square mirrors) to get 26.25 inches for the width. Then for the length measurements I just added 3 inches (.75 top side molding + two .75 horizontal moldings + .75 bottom side molding) to 36 inches (three 12 inch square mirrors) to get 39 inches for the height.
--------------------------
#2- Gather Supplies

Here's what all I had to buy:
-two 8 feet pieces of corner molding @ $3.97 each
-one 8 foot piece of lattice molding @ $3.97
-Liquid Nails Mirror Adhesive (in the caulk dept) @ $4.97
-one caulk gun @ $2.97
-one 2 pack of D-Rings @ $1.97
-one 3 pack of 50 lb Picture Hangers @ $1.97
-one 4 pack of Mirror Rosettes @ $1.97
-one can of Rustoleum Oil Rubbed Bronze Paint & Primer in one @ $6.97
-one 4'x4' of 3/4 inch pine plywood @ $16.97
-one 6 pack of 12"x12" mirror tiles @ $9.97 ( $30 at Lowes/HD or you could buy the smaller sizes at Hobby Lobby/Michaels)
=$59.67 spent
Here's what I already had on hand:
-Miter Saw and Miter Box (these cost about $10 together at Lowes...mine is well used)
-Industrial Glue Gun and Glue Sticks (about $15 together from Lowes)
- Elmers Industrial Pro Bond Wood Filler (about $5 from Lowes)
--------------------------
#3- Lay out Design
As soon as I got home with the plywood, I rushed into my shoproom extra bedroom and started laying out how I wanted it to look. I had taken my measurements with me to Lowes when I purchased the plywood. Lowes will make 2 cuts complementary, so I had my plywood cut to size. When I started laying things out, however, I realized both sides were a little too big. I think its my fault because that corner molding stuff even though the outside is 3/4 inch, the inside is more like 1/2 inch. The dotted lines in the picture below indicate where I need my plywood cut off.
So what next?? Well, I had to wait til morning when the battery for our circular saw (which has never been used) was charged. So Saturday, the circular saw got used....just to trim those pesky little slivers of the sides off my plywood. I have no pictures of this process....first time using a circular saw = zero pictures...all hands needed on deck for that. The edge was then much smaller and suitable to fit the corner molding. The circular sawing thing was actually a really smooth and easy process...I will definitely be using that fabulous power tool in the future.
--------------------------
#4- Cut Lattice Molding and Miter Corners
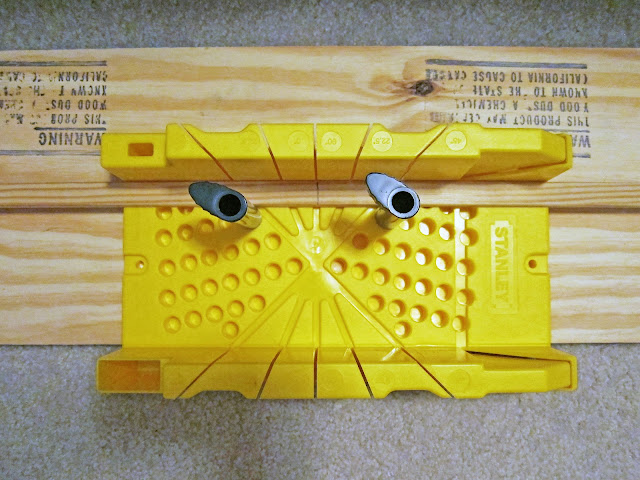
I laid the pieces of corner molding on the sides and then laid the mirrors flush up next to them. Then I took the lattice molding (just a flat piece of molding) and placed it down the center in between the mirrors. I used a pencil to mark where I needed to cut. Then I just put the piece into the miter box, lined the pencil mark up, and cut.
Why yes, that is my fine looking worktable I mean carpet and plywood-scrap miter box setup. It works great, thank you very much. At least it's not the kitchen island...I use that often for sawing...lol.
Next I did one of the long sides of corner molding. Now I am not gonna lie. These corner moldings are tricky. I messed up 2 pieces. Here's how I ended up resolving the issue. Lay them, mark the cuts with a pencil, and then add a 1/2 inch to each side. That seemed to work like a charm and cover up the 1/2 inch of inside that I mentioned earlier. Remember to cut your 4 corners at a 45 degree angle (like in the pic below) using the miter box.
Here's how it all looks just laying on top of the plywood after I got done making all my cuts.--------------------------
#5- Attach D-Rings and Wall Protection
So after laying it all out, I decided to go ahead and put the D-Rings to hang it on the back. That way I didn't have to drill them in after making the front all pretty....and therefore risk scratching the front up. I used two D-rings.
I also decided to add some huge, chunky circles of hot glue to the bottom. This way after it's hung, those hot glue circles will be hitting the wall rather than plywood.
I hate creating dents in the wall, so woot, woot for wall protection!
--------------------------
#6- Hot Glue on the Molding
Next, I hotglued (is that a word!?...it has to be, I use it all the time!) on the edge moldings. I ran a thick bead of hot glue down the center of the corner moldings. I also ran a thin bead on the edge of the plywood. Then I would press the molding onto the plywood making sure it lined up properly. Everytime I started a new side, I made sure all the pieces still fit together snugly. Better safe than sorry.
Check twice, hot glue once.
After getting all the corner molding onto the side, I hotglued the vertical lattice molding down the center. I opted to not hotglue the horizontal lattice molding pieces at this point.
--------------------------
#7- Wood Filler and Spray Paint!
After letting the hot glue dry, I smeared a smidge of wood filler into the corner cracks with my finger. Just a little bit...just enough to make the corners disappear. I let that dry for a few minutes til it was hard and then took the whole sha-bang outside to spray paint. I placed paint cans underneath it so I could spray paint the sides and top all at once. I placed the horizontal pieces and the mirror rosettes on top of it too, so that they would get a sprayed. Below is a pic of it spray painted, after I brought it back and started laying the mirrors and horizontal pieces back on to check the fit again. It looks black in the picture, but in person its a beautiful oil rubbed bronze.
--------------------------
#8- Adhere Mirrors and Hot Glue Horizontal Lattice
After making sure everything fit again, I started attaching the mirrors and horizontal lattice molding pieces. I started with the top left corner mirror, then the bottom left corner mirror, then did a horizontal lattice piece, then did the left center mirror, and then last left horizontal lattice piece. I used 5 big fat dots of mirror adhesive on the mirrors. (Although this might be a bit excessive. The bottle said it was good for 6 square feet of mirrors....and I ran out on my 5th mirror.)
I followed the same methodology for the right side. I then placed heavy objects on top of the mirrors to make sure they adhered well and laid flat.
--------------------------
#9- Hang Your Masterpiece
The liquid nails mirror adhesive says to wait 72 hours before hanging. Well, I've waited that long, but still haven't hung it. Why you may ask? Well, hanging things on the wall is my hubs job. He hangs all my masterpieces for me. Actually we kinda work as a team to hang things because I'm a bit of a perfectionist and it takes 2 to get it JUST right. Anyhow, DH has been crazy busy studying his head off for the dreaded CPA exam. Don't know what the CPA exam is?? Google it. It's really interesting...trust me. (Sike!) If you google it though then I'm sure you will find thousands of people currently sharing in my husbands test-taking misery.
So since I don't have it hung in that crazy triangularish shaped hallway of mine yet, I will just leave you with a shot of the finished mirror leaning on my living room wall.
I think it turned out GORGEOUS! It will make such a statement in that hallway. I know it doesn't look exactly like the Pottery Barn version, but I think I actually like the big mirror tiles better than the smaller ones. Also I spray painted the mirror rosettes, but after laying them in place I decided I liked it better without them. My completed version is a bit bigger than the PB Small Eagan Mirror. It measures about 26 inches wide by 39 inches tall and weighs 30 lbs. Costs about $60 to make my custom version over the $250 Pottery Barn version...thats over a 75% savings!
I CANNOT wait to hang it! Cute, sleepy pup not included in project. :)
And here's the side by side view of the Pottery Barn version and the Simply Sarah version.
Parties I'm Linking to:
I Heart NapTime- Sundae
Scoop
Making the World Cuter Mondays
Keeping It Simple- Motivate Me Mondays
Between Naps on the Porch- Metamorphosis Monday
G*Rated- Sunday Best
How to Nest for Less- Just a Party with my Peeps
Not Just a Housewife- Show Me What You've Got
Coastal Charm- Nifty Thrifty Tuesday
Making the World Cuter Mondays
Keeping It Simple- Motivate Me Mondays
Between Naps on the Porch- Metamorphosis Monday
G*Rated- Sunday Best
How to Nest for Less- Just a Party with my Peeps
Not Just a Housewife- Show Me What You've Got
Coastal Charm- Nifty Thrifty Tuesday


You did a beautiful job on this project. I did something on that order years ago, and I still have it hanging by he back door in my kitchen because it picks up all the light from the surrounding windows, which makes it seem like another window. I too have admired that PB mirror, but I won't pay that much either! I need to look for some of the beveled tiles (the old ones are not) and give this a whirl.
ReplyDeleteGreat job Sarah! I like yours the best. When you do these fabulous "knock off" projects maybe you should consider making two at a time and sell one on craigslist or something. You are so talented!
ReplyDeleteOH Amy thats a GREAT idea! I could make another to pay for my own.
DeleteThanks to both of you ladies for the sweet comments. :)
wow, i am totally impressed! i agree, it looks gorgeous!!! we'd love to have you link this up to our Sunday Best party going on now. http://griffithsrated.blogspot.com/2012/04/sunday-best-link-party.html
ReplyDelete-marie
Beautiful! I think I'm adding this to my project list.
ReplyDeleteYou did a fantastic job. It looks great!
ReplyDeleteReally, really, really cute!
ReplyDeleteI like to have them for my house.
ReplyDelete